|
|
|
【Amazon ランキング:ゲーム - PS Vita】
|
 |
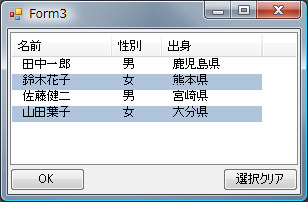
行単位で色を変えて見やすくしたリストをよく見かけますが、リストビューのオーナー描画機能を使えば比較的簡単に実現できます。 |
|
| オーナー描画イベント |
オーナー描画を行うにはまず ListView.OwnerDraw プロパティに True を設定します。するとリストビューに描画を行うためにに必要なイベントが呼ばれるようになるのでそれらのイベントをハンドルして好きなように描画します。
呼び出されるイベントは アイテムを描画する DrawItem、サブアイテムを描画する DrawSabItemそれと カラムヘッダを描画する DrawColHeader
の3つがあります。DrawItem と DrawSubItem は描画する範囲が重なっているのでハンドルするのはどちらか一方だけでいいです。また
View が Detail 以外ではカラムヘッダはないので DrawColHeader はハンドルしなくてもいいです。
さらに、イベントをハンドルしても特別な描画処理を行わない場合は e.DrawDefault に true を設定することでシステムに描画を任せる事もできます。
[VB]
Private Sub listView1_DrawColumnHeader(ByVal sender As System.Object, _
ByVal e As System.Windows.Forms.DrawListViewColumnHeaderEventArgs) _
Handles listView1.DrawColumnHeader
Private Sub listView1_DrawItem(ByVal sender As Object, _
ByVal e As System.Windows.Forms.DrawListViewItemEventArgs) _
Handles listView1.DrawItem
Private Sub listView1_DrawSubItem(ByVal sender As System.Object, _
ByVal e As System.Windows.Forms.DrawListViewSubItemEventArgs) _
Handles listView1.DrawSubItem
[C#]
private void listView1_DrawColumnHeader(object sender,
DrawListViewColumnHeaderEventArgs e)
private void listView1_DrawItem(object sender,
DrawListViewItemEventArgs e)
private void listView1_DrawSubItem(object sender,
DrawListViewSubItemEventArgs e)
|
| フォームの作成 |
 |
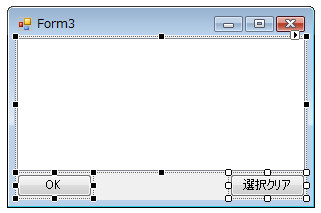
Form3を作成して、ListView, Buton を貼り付けます。
ListView:[listView1]
|
OwnerDraw |
True |
|
View |
Detail |
|
FullRowSelect |
True |
Button:[button1]
Button:[button2]
|
|
| VB[Form3.vb] |
Imports System.Text
Public Class Form3
Public Sub New()
' この呼び出しは、Windows フォーム デザイナで必要です。
InitializeComponent()
End Sub
Private Sub Form3_Load(ByVal sender As System.Object, ByVal e As System.EventArgs) _
Handles MyBase.Load
'リストビューに表示するデータ配列
Dim data(,) As String = New String(,) { _
{"田中一郎", "男", "鹿児島県"}, _
{"鈴木花子", "女", "熊本県"}, _
{"佐藤健二", "男", "宮崎県"}, _
{"山田葉子", "女", "大分県"}}
' ヘッダーの設定
Me.listView1.Columns.Add("名前", 100)
Me.listView1.Columns.Add("性別", 50)
Me.listView1.Columns.Add("出身", 100)
' リストビューのデータ追加
For row As Integer = 0 To 3
' リストビューアイテム作成
Dim item As ListViewItem = New ListViewItem(data(row, 0))
' サブアイテム追加
item.SubItems.Add(data(row, 1))
item.SubItems.Add(data(row, 2))
' アイテムをリストビューに追加
Me.listView1.Items.Add(item)
Next
End Sub
Private Sub button1_Click(ByVal sender As System.Object, ByVal e As System.EventArgs) _
Handles button1.Click
Dim txt As StringBuilder = New StringBuilder()
' 選択されているアイテム取得
For Each item As ListViewItem In Me.listView1.Items
If item.Selected Then
If txt.Length > 0 Then
txt.Append(",")
End If
End If
txt.Append(item.Text)
Next
MessageBox.Show(String.Format("選択アイテム[{0}]", txt.ToString()))
End Sub
Private Sub Button2_Click(ByVal sender As System.Object, ByVal e As System.EventArgs) _
Handles Button2.Click
' チェックをはずす
For Each item As ListViewItem In Me.listView1.Items
If item.Selected Then
item.Selected = False
End If
Next
End Sub
' カラムヘッダの描画
Private Sub listView1_DrawColumnHeader(ByVal sender As System.Object, _
ByVal e As System.Windows.Forms.DrawListViewColumnHeaderEventArgs) _
Handles listView1.DrawColumnHeader
e.DrawDefault = True
End Sub
' サブアイテムの描画
Private Sub listView1_DrawSubItem(ByVal sender As System.Object, _
ByVal e As System.Windows.Forms.DrawListViewSubItemEventArgs) _
Handles listView1.DrawSubItem
' 選択されている場合
If e.Item.Selected Then
' 選択されている場合
e.Graphics.FillRectangle(Brushes.LightGray, e.Bounds)
Else
' 奇数行だけ色を変える
If e.ItemIndex Mod 2 > 0 Then
e.Graphics.FillRectangle(Brushes.LightSteelBlue, e.Bounds)
End If
End If
' テキストを描画
e.DrawText()
End Sub
End Class
|
|
| C#[Form3.cs] |
using System;
using System.Collections.Generic;
using System.ComponentModel;
using System.Data;
using System.Drawing;
using System.Linq;
using System.Text;
using System.Windows.Forms;
namespace ListViewCS
{
public partial class Form3 : Form
{
public Form3()
{
InitializeComponent();
}
private void Form3_Load(object sender, EventArgs e)
{
// リストビューに表示するデータ配列
string[,] data = new string[,]{
{"田中一郎","男","鹿児島県"},
{"鈴木花子","女","熊本県"},
{"佐藤健二","男","宮崎県"},
{"山田葉子","女","大分県"}};
// ヘッダーの設定
this.listView1.Columns.Add("名前", 100);
this.listView1.Columns.Add("性別", 50);
this.listView1.Columns.Add("出身", 100);
// リストビューのデータ追加
for (int row = 0; row < 4; row++)
{
// リストビューアイテム作成
ListViewItem item = new ListViewItem(data[row, 0]);
// サブアイテム追加
item.SubItems.Add(data[row, 1]);
item.SubItems.Add(data[row, 2]);
// アイテムをリストビューに追加
this.listView1.Items.Add(item);
}
}
private void button1_Click(object sender, EventArgs e)
{
StringBuilder txt = new StringBuilder();
// 選択されているアイテム取得
foreach (ListViewItem item in this.listView1.Items)
{
if (item.Selected)
{
if (txt.Length > 0)
txt.Append(",");
txt.Append(item.Text);
}
}
MessageBox.Show(string.Format("選択アイテム[{0}]", txt.ToString()));
}
private void Button2_Click(object sender, EventArgs e)
{
// チェックをはずす
foreach (ListViewItem item in this.listView1.Items)
{
if (item.Selected)
item.Selected = false;
}
}
// カラムヘッダの描画
private void listView1_DrawColumnHeader(object sender,
DrawListViewColumnHeaderEventArgs e)
{
e.DrawDefault = true;
}
// サブアイテムの描画
private void listView1_DrawSubItem(object sender, DrawListViewSubItemEventArgs e)
{
// 選択されている場合
if (e.Item.Selected)
{
e.Graphics.FillRectangle(Brushes.LightGray, e.Bounds);
}
else
{
// 奇数行だけ色を変える
if (e.ItemIndex % 2 > 0)
e.Graphics.FillRectangle(Brushes.LightSteelBlue, e.Bounds);
}
// テキストを描画
e.DrawText();
}
}
|
|
|
※このページで紹介しているサンプルコードについて管理者は動作保障をいたしません※
※サンプルコードを使用する場合は、自己責任でお願いします※
|
【楽天 ランキング:パソコン・周辺機器 - パソコンソフト】
|
|
|
|
このサイトはフリーソフトのMerge HTMLで作成されています。
このサイトはリンクフリーです。
|
| ページの先頭に戻る |
Copyright© 2010-2015 Jun.Shiozaki All rights reserved. |
|
|
|
|


